Switching Technologies Primer
Cisco Catalyst 2950 (24 - 10/100 Ethernet) Switch Configuration
To reset the Cisco 2950 switch to factory default:
1. Connect a Cisco console cable to the console port on the switch
2. Power on the switch holding down the mode button until you see the following prompt
Using driver version 1 for media type 1
Base ethernet MAC Address: 4c:30:2d:81:ef:80
Xmodem file system is available.
The password-recovery mechanism is enabled.
The system has been interrupted prior to initializing the
flash filesystem. The following commands will initialize
the flash filesystem, and finish loading the operating
system software:
flash_init
boot
switch:
3. Initialize the flash file system with the command flash_Init
4. Delete the config.text file by entering – del flash:config.text
5. Delete the vlan.dat file from the flash directory by entering – del flash:vlan.dat
6. Reboot the switch
To configure the Cisco 2950 switch per our BNUG demo switch plan:
1. Connect a Cisco console cable to the console port on the switch
2. Power on the switch
3. When prompted to enter the initial configuration dialog and basic management setup, answer No. We will configure all required commands via the CLI. Enter the following commands:
4. enable
5. clock set hh:mm:ss day month year (i.e. 13 Nov 2018)
6. config t
7. hostname cisco_2950
8. enable secret secretPW (i.e. BNUGifm!)
9. Line vty 0 15
a. password telnetpw (i.e BNUGifm!)
b. exit
10. interface vlan 1
a. ip address 192.168.100.5 255.255.255.0
b. no shutdown
c. exit
11. show VLAN
12. copy run start
13. config t
14. vlan 2
a. name SAN
15. vlan 3
a. name VMotion
b. exit
16. int range fa0/1 -7
a. switchport mode access
b. switchport access vlan 1
17. int range fa0/8- 14
a. switchport mode access
b. switchport access vlan 2
18. int range fa0/15-21
a. switchport mode access
b. switchport access vlan 3
c. exit
19. show vlan
20. copy run start
21. config t
22. int range fa0/22 -24
a. switchport mode trunk
b. channel-group 1 mode on
c. exit
23. show etherchannel summary
24. show interface trunk
25. show vlan
26. copy run start
Dell PowerConnect 2748 (48 - 10/100/1000 Ethernet) Switch Configuration
To reset the Dell PowerConnect 2748 switch to factory default:
1. With the switch powered on depress the Mode button until the Managed light blinks. This light will blink for about two minutes and then turn off.
2. Depress the Mode button again until the Manager light is back on. Wait two minutes.
3. Cable the configuration laptop’s Ethernet port to any switch port
4. Set the laptop’s IP to be 192.168.2.100/24
5. Open a browser and connect to http://192.168.2.1
6. Login as admin with no password
7. Do not restore configuration. Just hit Apply Changes. You will see a message stating that the device will be reset. Hit OK.
To configure the Dell PowerConnect 2748 switch per our BNUG demo switch plan:
1. Under the Switch Status tab enter -
a. Name: Dell_2748
b. Date: 13/Nov/18
c. Time: hh:mm:ss
d. Apply changes
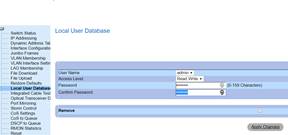
2. Under the Local User Database tab, select the admin user and enter a verify a secure password, then Apply
3. Under the IP addressing tab enter –
a. IP address: 192.168.100.6
b. Subnet Mask: 255.255.255.0
c. Default Gateway: 192.168.100.1
d. Apply changes, then reboot
4. Change the IP address of the configuration laptop to 192.168.100.100/24, browse to 192.168.100.6 and then relogin as Admin with no password.
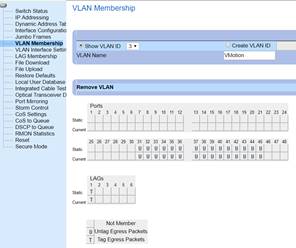
5. Under VLAN Membership, Create the following VLANs
a. VLAN 1 Default VLAN … this should already be there
b. VLAN 2 SAN
c. VLAN 3 VMotion
6. Initially, for VLAN 1 all ports and all LAGs will be listed as U(ntagged). After we assign other VLANs to ports and set the correct PVID, VLAN1’s port assignments will look like this:

7. Select VLAN 2 and update ports 16-30 to be U(ntagged) and LAG 1 to be T(aged) like this:

8. Select VLAN 3 and update ports 16-30 to be U(ntagged) and LAG 1 to be T(aged) like this:
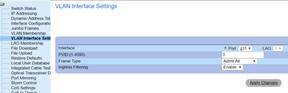
9. Go to the VLAN Interface Settings and verify that ports 1 -15 and LAG 1 are set to PVID 1.

10. Go to the VLAN Interface Settings and change ports 16 - 30 to PVID 2. Select Apply after each port change.

11. Go to the VLAN Interface Settings and change ports 31 - 45 to PVID 3. Select Apply after each port change.
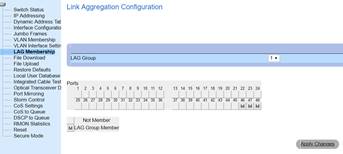
12. Go to the LAG Membership tab, select LAG 1 and then assign ports 46 -48 as M(embers).
Can We Talk?
1. With my PC (192.168.100.100) in port C1 and Adam’s PC (192.168.100.200) in port C5, can we talk?
2. With my PC (192.168.100.100) in port C1 and Adam’s PC (192.168.100.200) in port C11, can we talk?
3. With my PC (192.168.100.100) in port C1 and Adam’s PC (192.168.100.200) in port D1, can we talk?
4. With my PC (192.168.100.100) in port C1 and Adam’s PC (192.168.100.200) in port D1, and we remove trunk port D46, can we talk?
5. With my PC (192.168.100.100) in port C1 and Adam’s PC (192.168.100.200) in port D1, and we remove trunk ports D46, D47 and D48, can we talk?
Putting all trunk cables back in place…
6. With my PC (192.168.100.100) in port C1 and Adam’s PC (172.16.100.200) in port C5, can we talk?
7. With my PC (172.16.100.100) in port C9 and Adam’s PC (172.16.100.200) in port C14, can we talk?
8. With my PC (172.16.100.100) in port C9 and Adam’s PC (172.16.100.200) in port D29, can we talk?
9. With my PC (10.16.100.100) in port C21 and Adam’s PC (172.16.10.200) in port D40, can we talk?
10. With my PC (10.16.100.100) in port C21 and Adam’s PC (10.16.100.200) in port D40, can we talk?
>80% wins a prize!
Bonus Question
A. The Dell 2748 switch is a 48 x 10/100/1000 mb/s switch. The Cisco 2950 switch is a 24 x 10/00 mb/s switch. What is the negotiated speed of the three Dell LACP trunk ports D46, D47 and D48?